|
Phoenix Imaging is a provider of machine vision
systems, machine vision components, image
processing computers, compact machine vision systems, machine
vision software and
integrated turn-key solutions for industrial applications.
Phoenix Imaging is based in the Livonia, Michigan (Western
Suburbs of Detroit) and has been servicing the United States and Ontario.
Phoenix Imaging has agreed to an
industry Code of Ethics and has access to the most up to date information
available, including professional certification, training and continuing
education; state of the art technology; technical services; industry trends and
statistical data; and research and development.
The company has expertise
in wide range of machine vision technologies, with specializations in:
-
Stand-alone Machine Vision
Inspection Systems,
-
Surface
Inspection and Flaw Detection Systems (AVSIS™),
-
Porosity
detection (and surface blemishes) inside and on surface of machined components (AVSIS™),
-
On-line Non-contact
Dimension
Measurement systems (VCMM) provides accurate measures and low GR&R,
-
Assembly Verification systems (monochrome and color)
or component configuration,
-
Wore and Broken Tool Status
Advisor Systems (CNC-TSA™),
-
Infrared (IR)
Inspection systems,
-
Optical Character
Recognition (OCR / OCV) systems.
-
Advanced Integrated Robotic
Inspection Systems.
-
Integrated Laser Mark
Traceability / Inspection Systems.
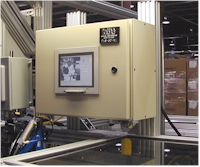
Phoenix Imaging's highly skilled team
of vision engineers provide a non-biased appraisal of machine vision
applications. The team can draw on expertise from simple integrated smart
sensors to highly complex multiple format sensor inspection systems. The
company provides consultation solution to determine if a viable solution is at
hand or if new technology is required. Phoenix Imaging has worked with
100's of companies in the development of machine vision algorithms, low level
vision tools, and basic physics to engineer front-end optical solutions.
Phoenix Imaging has been designing and
fabricating illumination systems for machine vision projects since the early
1990's. The lighting system include High Frequency Fluorescent (both open
and closed loop control, over 300 different models available), extremely uniform
LED back lighting system (3 series), LED spotlights (3 series), precision
control light sources for challenging vision applications. Patented
illuminations systems for large format flat components, Ceramic Tile / Glass
Inspection Chambers, world class manual inspection environments and custom lighting systems for unique customer applications.
Our LED Backlights generate extremely flat illumination fields and are used by
system integration companies and end-users worldwide.
The
company offers machine vision integration services for all of the products and
services that
the company offers including: sensors, lenses, lighting products, image
processors, and hardened inspection system for the industrial environment. Products and services are
available to a wide customer base which includes: original equipment manufacturers, system
integrators, machine builders and end-users. Phoenix Imaging offers a wide
selection of machine vision systems from the low-cost compact vision sensor to
complex image processing systems
utilizing multiple high-resolution
mega-pixel sensors.
Machine vision systems can be purchased as complete turnkey solutions,
partial assemblies or as machine vision components. The machine vision
integration services are available for complete automatic inspection systems or
retro-fit to existing manufacturing lines. The machine vision equipment
can be installed for on-line inspections or off-line inspection. Special
application packages for machine vision systems used in the areas of surface
inspection, seal inspection, porosity, tapped hole, true position, precision
dimension checks and assembly verification.
---
Surface Inspection Systems
and
Porosity Inspection Systems
---
Unique Patented
Technology
is ideal for Surface Inspection Projects!
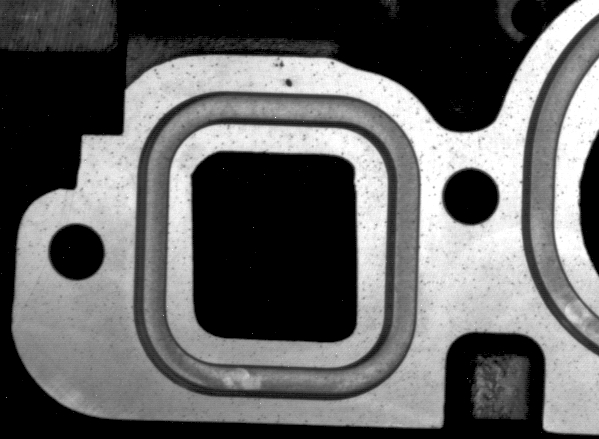
Phoenix Imaging has
received a US Patent for
Advanced Surface Inspection Technology for the Detection of Porosity and Surface
Imperfections on Machined Metal Surfaces.
Because the
technology is unique, Phoenix Imaging has been issued US Patent
protection ( US 7,394,530).
The technology implements a unique illumination technique that reduces the
effects of surface texture created by the machining process but enhances the
surface abnormalities. This technology is extremely useful in the detection of
porosity that is often found on machined aluminum components.
The technology allows the customer to
assign multiple inspection zones on a surface and apply a separate inspection
criteria to each of them. The inspection zones are aligned to each new
component using manufacturing datum. In addition the technology allows the
customer to measure the dimensions of key feature and measure the position of
the features with respect to the datum. Phoenix Imaging refers to this new
technology as VCMM or “Virtual Coordinate Measurement Machine”.
This technology is not meant to replace existing CMM equipment because it is
designed to measure key feature on components in an on-line mode of operation.
This requires that the features to be inspected must be taught prior to use.
This may require fixtures and specific lighting conditions for the inspection.
What the technology does provide is the ability to inspect 100% of your
components for surface imperfections and the true position of key features with
respect to one or more datum.
Surface inspection of machined metal
components often expose porosity that lies beneath the surface in the casting.
Once exposed the porosity can affect the sealing surface integrity and impact
warranty cost. Phoenix Imaging has developed a range of porosity and
surface inspection systems to identify these defects so that manufacturing can
contain defective products before they reach the customer.
Phoenix Imaging offers a turn-key
inspection package using unique inspection modules developed explicitly for
surface inspection. The patent pending inspection methodology allows the
customer to define multiple inspection zones each with a different set of
inspection criteria. Automatic alignment tools insure that the inspection
is performed correctly even if the component is not located in the proper
position. The inspection algorithms isolate, measure, count, determine
defect density and proximity. With the proper access level the customer
can make adjustments to the inspection parameters using the human machine
interface (HMI).
Each system is designed to meet the
requirements of each customer for porosity measurement, component size and cycle
time. In-line and off-line inspection system have been implemented to
accommodate the customer work flow.
Tell
me more about porosity inspection technology!
Patented
Machine Vision based
Broken Tool Detection System
TOOL STATUS ADVISOR (CNC-TSA™)
US Patent 7,266,420 for a Machine Vision System
for detection & measurement of CNC machine tools
 and
and

[ Tool Inspection in Production ]
[ Master Tool Setup and Receiving Inspection ]
Phoenix Imaging has announced the release
of the new Machine Vision
System used for inspection of CNC cutting tools inside the
machining centers and for checking receiving inventory. The product learns the shape
of new cutting tools and measures the change in the profile. This
technology allows manufactures of high value component to capture defective
conditions as soon as they occur and prevents the manufacture of subsequent
defective components!
The product can be retrofit into existing CNC machining
centers or checking the shape of tools as they are received in to inventory.
The system is called the Tool Status Advisor and it is available in
several configurations. The MET-TSA™ is used to teach the
characteristics of a new tool and the CNC-TSA™ is used to
determine the degree of wear on production tools.
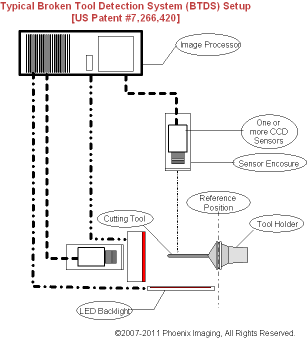
 The
typical system is based on the PVS-80 vision controller,
with one or more vision sensors (mounted inside environmental enclosures), and one or
more corresponding LED lighting units. Backlighting is used for tool
silhouette and ring lighting is used to highlight leading edge imperfection when
viewed down the tool axis. The PVS-80 is
pre-mounted inside a NEMA type-4 (IP65) electrical enclosure and is available
with a 15" TFT flat panel touch screen display for parameter adjustment and
inspection information. The system can accommodate direct inputs and outputs
for communication of inspection conditions to external devices. The Standard configuration
provides 8 inputs and 8 outputs connected through industrial standard optical
isolated relay modules. A special version PVS-85 is designed for OEM
customers that would like to mount the image processor inside their own
electrical enclosures. The
typical system is based on the PVS-80 vision controller,
with one or more vision sensors (mounted inside environmental enclosures), and one or
more corresponding LED lighting units. Backlighting is used for tool
silhouette and ring lighting is used to highlight leading edge imperfection when
viewed down the tool axis. The PVS-80 is
pre-mounted inside a NEMA type-4 (IP65) electrical enclosure and is available
with a 15" TFT flat panel touch screen display for parameter adjustment and
inspection information. The system can accommodate direct inputs and outputs
for communication of inspection conditions to external devices. The Standard configuration
provides 8 inputs and 8 outputs connected through industrial standard optical
isolated relay modules. A special version PVS-85 is designed for OEM
customers that would like to mount the image processor inside their own
electrical enclosures.
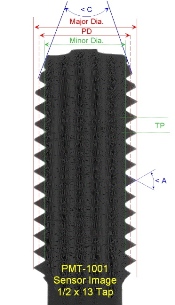
Perhaps the most versatile feature on the MET-TSA™ is that it allows the user to
easily create master images of tooling
for comparison of new tools as they are replaced in tool holders. Unlike many
other tool detection technologies the CNC-TSA™ can find wore or partially broken
tools such as worn drill bit edges and chipped edges on taps. The vision system allows access to 100
tool profiles which can be called by index position or program control registers
accessed with binary coding.
Other features include:
- Microsoft Windows7 or Windows10 Pro Operating Systems
- Support for up to 4 High-Speed Progressive Scan Sensors
- Gig-E Vision or USB3 Sensor Connections
- Touch Screen Input for Setup and Function Control
- High Resolution Graphics (Digital and Analog Outputs)
- USB ports for connecting Keyboard and Mouse
- EtherNet Port (100/1000 MB and assignable IP address for
system)
- Many Special Image Processing Functions (many
Patented or Patent Pending)
The
machine vision system allows for the simultaneous acquisition of two
progressive-scan sensors at a time. Each sensor can be mounted up to 100 M
(Gig-E Vision) or 20 M (USB3) from the PVS-80
or PVS-100 image processing enclosure.
Phoenix Imaging also offer a compact integrated
sensor/processor module (SCNC) which provides a cost effective solution for
customers that only require knowledge that the tool has experienced damage and
not wear prediction.
| 



 The
typical system is based on the PVS-80 vision controller,
with one or more vision sensors (mounted inside environmental enclosures), and one or
more corresponding LED lighting units. Backlighting is used for tool
silhouette and ring lighting is used to highlight leading edge imperfection when
viewed down the tool axis. The PVS-80 is
pre-mounted inside a NEMA type-4 (IP65) electrical enclosure and is available
with a 15" TFT flat panel touch screen display for parameter adjustment and
inspection information. The system can accommodate direct inputs and outputs
for communication of inspection conditions to external devices. The Standard configuration
provides 8 inputs and 8 outputs connected through industrial standard optical
isolated relay modules. A special version PVS-85 is designed for OEM
customers that would like to mount the image processor inside their own
electrical enclosures.